Audio & MIDI Piano Visualizer — User Manual
What is the Piano Visualizer?
The Mazmazika Audio & MIDI Piano Visualizer turns music into notes you can watch. Give it a MIDI file — or a song, a YouTube link or an audio upload — and it opens a full-screen stage where every note falls onto an interactive piano keyboard as it plays. You can mute and solo individual instruments, hide them from the grid, remix the balance, follow along at your own tempo, and record the result as a video.
There are two ways in, and they behave quite differently. MIDI sources — the curated library and your own .mid files — already contain the notes, so they open instantly and play back exactly as written. Audio sources have to be transcribed by AI first: the tool listens to the recording and works out what was played. That side is labelled Experimental on the page, and honestly so — machine transcription of real recordings is imperfect, which is why the length limits are short and the results need your ear.
You need a free Mazmazika account. You can browse and set everything up as a visitor, but the moment you press Visualize & Transcribe you are asked to sign in — including for the curated library. Sign-in happens in place and your run continues by itself.
Getting started
Open the Audio & MIDI Piano Visualizer from the left sidebar — it is the top entry. The page is one tall card that walks you through numbered steps, and the steps you see depend on where your music comes from: a MIDI source needs only step 1, while an audio source adds the engine, destination and (sometimes) stem choices.
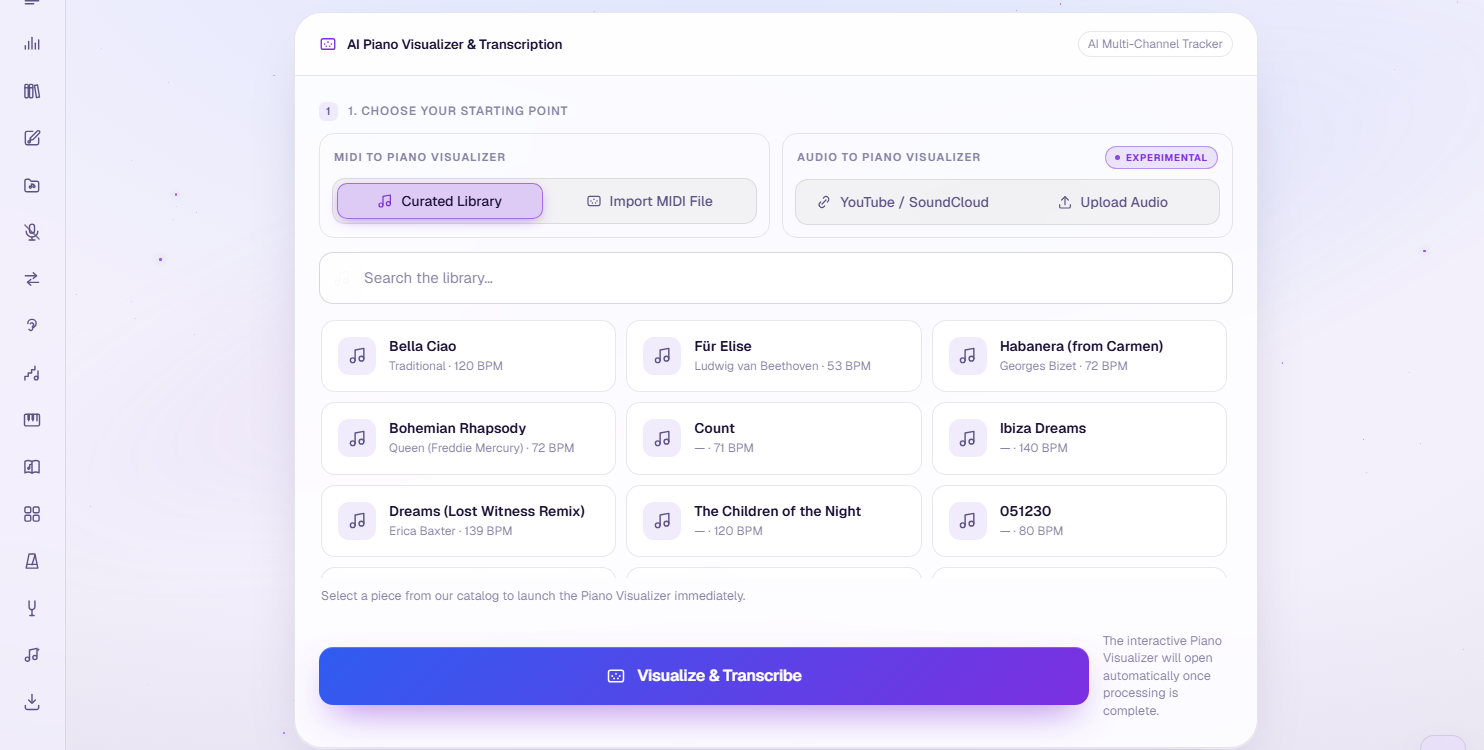
1. Choose your starting point. Four tabs in two groups:
- Curated Library — 575 ready-made pieces across five categories (Pop & Rock, Games & Anime, Classical, Film & TV, Traditional & Folk). Type in Search the library… to filter, then pick a card; each one shows the composer and the tempo. These are real MIDI files, so nothing is transcribed and nothing is guessed.
- Import MIDI File — drop in your own
.midand it opens on the stage as-is. No length limit applies to MIDI. - YouTube / SoundCloud — paste a link and the audio is fetched for you; there is nothing to download first.
- Upload Audio — an MP3, WAV or M4A from your device.
For the two audio tabs you also choose Complete Track or Trim Segment. Trim fetches the audio first and then hands you a waveform editor with in and out handles, so you can transcribe just the chorus or just the solo. This matters more than it sounds — see How long a track can be below.
Choosing a transcription engine
Audio sources need an engine, because no single model is good at everything. Each card names what it is for, and once you are signed in it also carries the length it will accept on your plan.
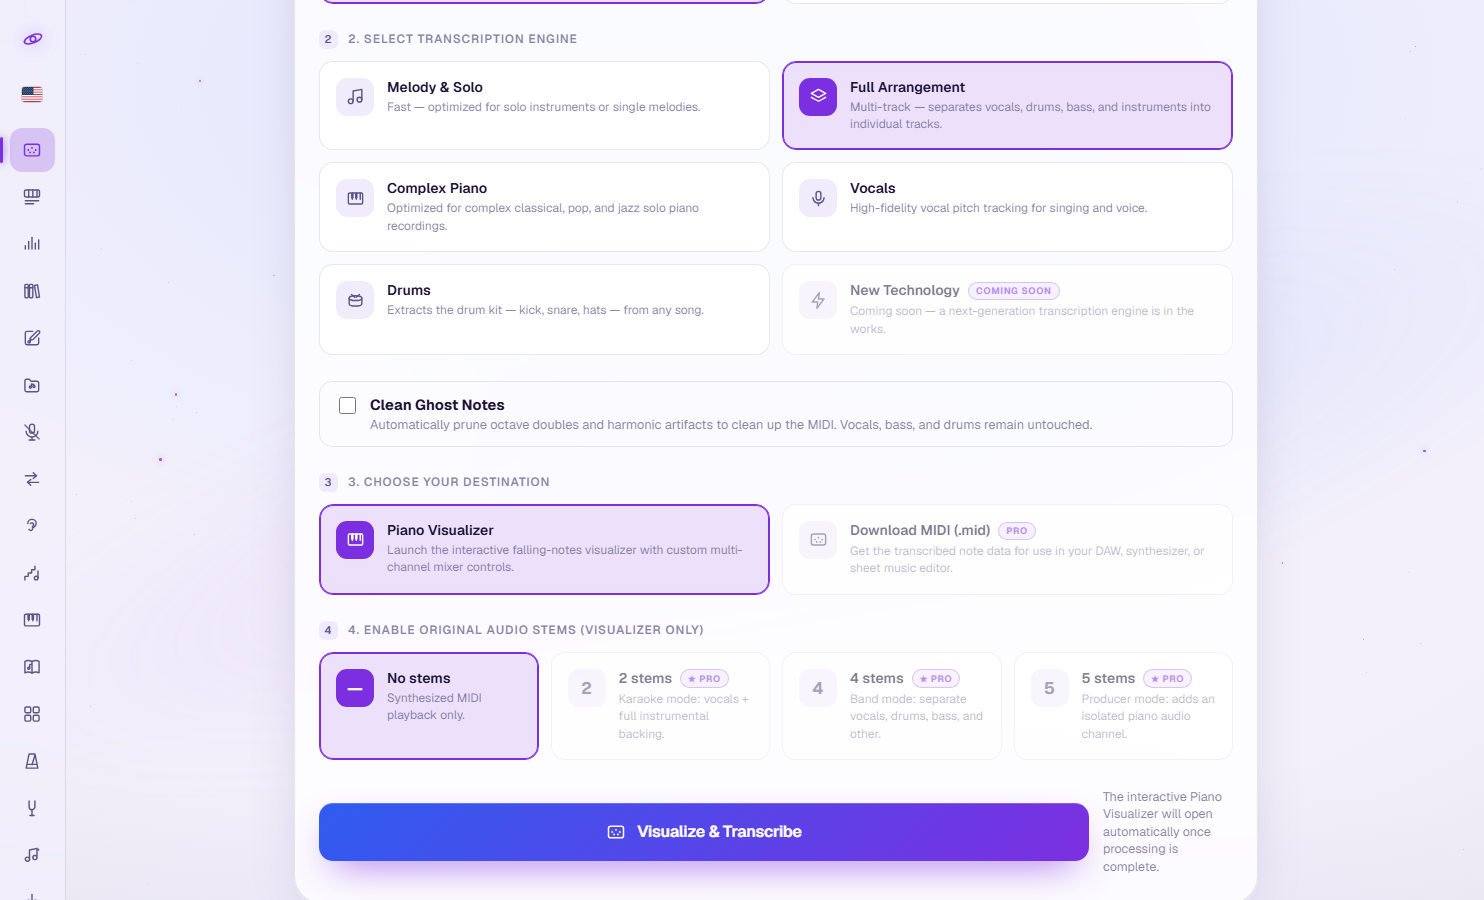
- Melody & Solo — fast, and the most forgiving. Built for one instrument or one melodic line at a time.
- Full Arrangement — the multi-track option: it separates vocals, drums, bass and instruments into their own tracks. It is the most impressive result and by far the most expensive to compute, which is why it has the shortest length limit on the page.
- Complex Piano — tuned for dense solo piano: classical, pop and jazz recordings.
- Vocals — high-fidelity pitch tracking for a single sung or spoken voice.
- Drums — pulls the kit out of a full mix: kick, snare, hats.
- New Technology — a placeholder card badged Coming Soon. It is deliberately not clickable; a replacement engine is being worked on.
Clean Ghost Notes is a checkbox under the grid. AI transcription tends to hallucinate notes an octave above or below what was really played, and to smear harmonics into phantom harmony. Turning this on prunes those after the fact. Leave it off if you would rather see exactly what the model wrote. It does not touch vocals, bass or drums.
Where the result goes
3. Choose your destination appears for audio sources only — MIDI sources always go straight to the stage.
- Piano Visualizer — opens the interactive stage. Available on every plan.
- Download MIDI (.mid) — Pro only. Gives you the note data as a standard MIDI file for a DAW, a synth or a notation editor. On a free account the card is dimmed and carries a Pro badge; clicking it opens the upgrade card instead of selecting it.
If you picked Full Arrangement and the Piano Visualizer destination, a fourth step appears: Enable Original Audio Stems. This is what powers the stage's Arrangement / Original switch — it separates the real recording so you can flip between the synthesized notes and the actual audio.
- No stems — synthesized MIDI playback only. Available on every plan.
- 2 stems · 4 stems · 5 stems — Pro only (karaoke: vocals + backing; band: vocals, drums, bass, other; producer: adds an isolated piano channel).
Then press Visualize & Transcribe. Transcription runs on our servers and shares a queue with the Vocal Remover, the MP3 Downloader and the Chord Analyzer, so at busy moments you may see a queue position for a moment. Pro accounts are served first.
How long a track can be
This is the single most important thing to understand before you use the audio side. The limit is per engine, not per tool, because the engines cost wildly different amounts to run:
| Engine | Free | Pro |
|---|---|---|
| Melody & Solo | 2:00 | 6:00 |
| Complex Piano | 1:00 | 3:00 |
| Vocals | 1:00 | 4:00 |
| Drums | 1:00 | 2:00 |
| Full Arrangement | 0:30 | 1:00 |
So a free account gets thirty seconds of Full Arrangement, and six minutes of Melody & Solo on Pro. Once you are signed in each engine card shows its own figures, so you never have to guess.
This is exactly what Trim Segment is for. Rather than refusing a long song, the tool lets you choose which part of it to transcribe: the waveform editor clamps your selection to the length your plan allows, and a grip in the middle of the selection slides that whole window along the track. Drag it over the chorus and you get the chorus. If you paste a long link and pick Complete Track anyway, the segment is cropped for you and the run is logged as having hit the limit.
MIDI sources are never length-limited. A twelve-minute symphony from the curated library or from your own .mid opens in full.
How many runs a day
The three ways in are counted separately, so using one does not eat the others. On a free account, per day:
| What you did | Free | Pro |
|---|---|---|
| AI transcription of audio | 1 per day | Unlimited |
| Import your own MIDI file | 1 per day | Unlimited |
| Open a curated-library piece | 2 per day | Unlimited |
When a counter runs out, the tool says so plainly and points at the upgrade page. The counters reset daily.

The stage
When processing finishes, the visualizer takes over the whole screen. The piece name sits top-left and a ✕ closes the stage top-right. Notes fall from above and land on a piano keyboard along the bottom edge; each track has its own colour, and the keys light up in that colour as the notes arrive.
On a phone in portrait the entire stage rotates 90°, so the note roll always runs the long way across your screen rather than being squeezed into a narrow column. Turn the phone sideways and it reads normally.
Along the bottom is the transport bar:
- Play / Pause, the progress bar (drag or click to seek), the elapsed and total time, and a volume slider — all available on every plan.
- Loop — Pro. Click it, then click the first and the last note of the section on the grid; that section then repeats, with a short breath between passes so the audio stays clean. Click again to clear.
- View / Edit — Edit is Pro. See Editing the notes below.
- Export MIDI — Pro. Saves a
.midof the piece exactly as it plays right now, including any edits you made. - Arrangement / Original — appears only when the piece has audio stems. Flips between the synthesized instruments and the real recording, in time, without stopping.
- Tempo — Pro. A BPM box with − and + steps (20–300) and a reset button back to the piece's own tempo. This is how you slow a passage down to learn it.
- Save as MP4 video — records the stage to a video file. It records from wherever the playhead currently is to the end of the piece, or until you press stop, and it captures your current mix — tracks, dials, tempo and all. Pause where you want the recording to begin before you start. 480p and 360p are available on every plan; 720p and 1080p are Pro.
The Tracks mixer
A floating Tracks panel lists every channel in the piece. Drag its header to move it anywhere on the stage, collapse it with the chevron, or reset everything to the file's own settings with the circular arrow. Per track you get:
- a colour dot and the track name — the same colour its notes and keys use;
- an instrument chooser — Pro. Swap the synth or sampler that plays this track (drum tracks get a list of drum sounds instead);
- a live level meter and a volume dial reading 0–127, with a tick marking the file's own level;
- M and S — mute and solo, for what you hear;
- a second pair beneath them for what you see: hide this track from the grid, or show only this track. Audio keeps playing either way, which is the point — you can listen to the full arrangement while watching one line.
Along the bottom of the panel:
- Auto-level — context mixing: backing parts duck under the lead and lift again when they play alone. Turn it off for the file's own levels. Available on every plan.
- Hover top, Solo top and Loud top — three ways of deciding which channel is drawn on top of the others: whichever you point at, whichever is playing alone, or whichever is loudest. Min switch (0–5 s) stops that from flickering by ignoring any section shorter than the time you set. All available on every plan.
- Key colours: Instrument colours the keys per track and is available to everyone; Single — one colour for everything — is Pro.
- Auto-boost and the five mastering dials below it — Dynamics, Warmth, Mud dip, Air and Glue threshold, each 0–100 — are Pro. Auto-boost analyses the piece and picks a combination for all five; every value stays adjustable afterwards, and unticking it returns all five to 0.
Editing the notes
Switching from View to Edit is a Pro feature, and it makes the falling-note grid directly editable — useful when the AI misheard something, or when you want to fix a MIDI file before exporting it. In Edit mode:
- drag a note to move it — along the roll changes its timing, across the roll changes its pitch;
- drag its edge to make it longer or shorter;
- right-click a note to delete it;
- click a note to hear it on its own;
- ⌘Z / Ctrl+Z undoes and ⌘⇧Z / Ctrl+Y redoes. These work only while Edit mode is on.
Your edits are what Export MIDI and Save as MP4 video capture, so the order is: fix the notes, then export.
Sharing a piece
Every piece in the curated library has its own address. /audio-midi-to-piano-visualizer/fur-elise opens the tool with Für Elise already selected, so you can send a link straight to a piece instead of describing where to find it.
There is also a companion page, the MIDI Piano Visualizer Library, one entry below this tool in the sidebar. It browses the same 575-piece catalogue in a fuller layout — category chips, sorting and endless scrolling — and each card opens that piece on the stage. Use the tab inside the tool when you are already working; use the library page when you want to go looking.
Tips
- Start from the curated library. It costs nothing to guess wrong, opens instantly, and shows you what the stage can do before you spend a transcription on your own audio.
- Match the engine to the recording, not to your ambition. A solo piano recording through Complex Piano beats the same file through Full Arrangement — and gets you a minute instead of thirty seconds.
- Trim before you transcribe. A well-chosen thirty seconds is more useful than a whole song the tool would have cropped for you anyway.
- Use the eye buttons, not mute, to learn a part. Hiding the other tracks from the grid while they keep playing lets you follow one hand or one instrument in context.
- Turn on Clean Ghost Notes if a transcription looks unexpectedly busy — most of the clutter is usually octave doubles rather than real notes.
Troubleshooting
- Asked to sign in? That is expected — every path needs a free account, including the library. Signing in happens in place and your run picks up where it left off.
- The transcription missed notes, or invented some. The audio side is marked Experimental for this reason. Try a more specific engine, tick Clean Ghost Notes, trim to a cleaner passage, or start from a MIDI file if you have one. Dense mixes, heavy reverb and distorted guitars are the hardest cases.
- It refused a long song. Check the figures on the engine card: the limit belongs to the engine, not to the tool. Either pick a lighter engine or use Trim Segment.
- You have run out for today. The three counters are separate — if AI transcription is used up, a library piece or a MIDI import may still be available.
- No sound on the stage? Click once anywhere first — browsers only start audio after you interact with the page — then check the volume slider, the track dials and your device volume.
- The video came out shorter than expected. Recording starts at the playhead, not at the beginning. Pause at the start of the piece before you press record.
Related tools
Split a song into stems with the Vocal Remover, find its chords with the Chord Analyzer, write your own score in the Notes Editor, or play along on the Virtual Piano.