Beat Maker — User Manual
What is the Beat Maker?
The Mazmazika Beat Maker (a.k.a. Beat Atelier) is a full beat-production studio that runs entirely in your browser — nothing to install, no account needed. Program drums and melodies on a step sequencer, layer instruments, shape the sound with a real mixer and effects, arrange a full song, then export or share your beat. Every feature is free.
It is built for every rhythm tradition, not just 4/4: Arabic iqaa'at, Indian taals, Flamenco compás, Balkan odd meters, and microtonal scales (Bayati, Rast, Saba) are first-class citizens — you can even detune a single note in cents for maqam work. Every sound is synthesised live in Web Audio — no sample packs needed — and you can drop in your own audio whenever you like. Every change auto-saves to your browser, so you can refresh and pick up exactly where you left off.
Getting started
Open the Beat Maker from the left sidebar (or Audio Tools → Beat Maker). On your first visit a short guided tour points out the main areas — step through it with ← → and Enter, or skip it and reopen it any time from Help → Take the Tour. The same Help menu also holds the built-in User Guide and the Command Palette (⌘K), which searches every action in the studio. The whole studio sits inside the familiar Mazmazika "cosmic" workspace, with the tool rail on the left and a tidy toolbar across the top.
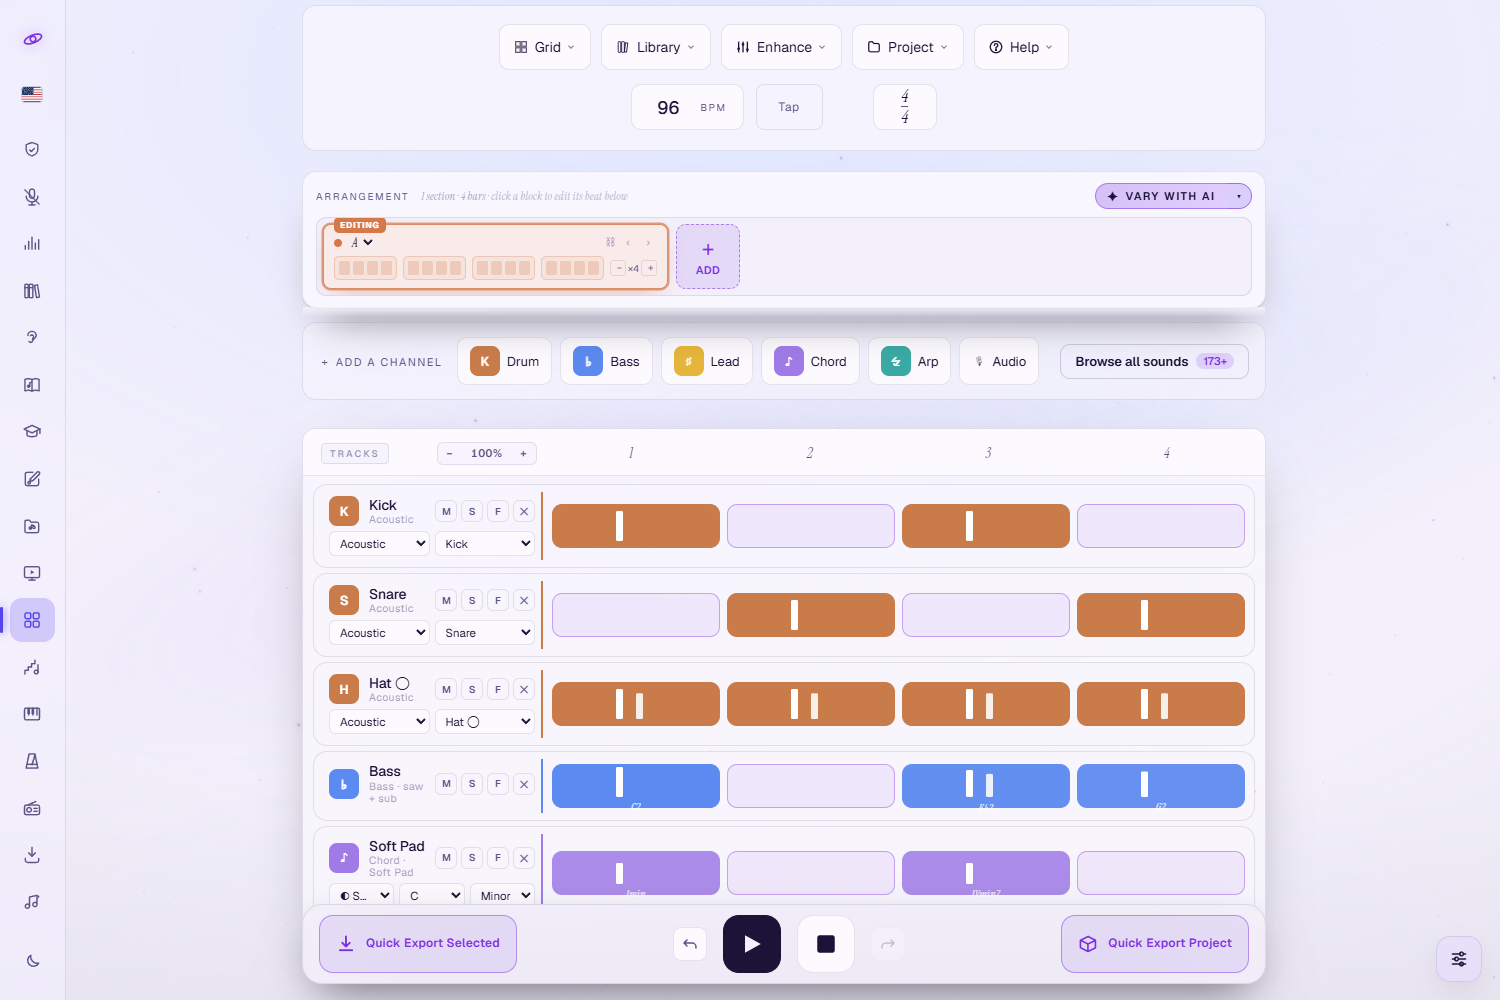
The layout has three bands you will use constantly:
- The top toolbar — five grouped menus, the tempo and time-signature controls. The first menu carries the name of the view you are in (Grid to start with); the other four are Library, Enhance, Project and Help.
- The arrangement & channels — the section strip, the Add a channel chips, and the step sequencer where you actually build the beat.
- The floating transport — a glass bar pinned to the bottom with Play / Stop, Undo / Redo, and one-click Quick Export buttons that follow you as you scroll.
Tip: the appearance Tweaks panel lives behind the small button in the bottom-right corner — it holds the light/dark mode, a long list of colour palettes, per-track colour sets, the cell shape and fill, the row density and a choice of typefaces. Collapse it to give the studio the full width.
A note on language: the toolbar, the menus, the sound library and the export panel follow your Mazmazika language. A few of the deeper panels are only available in English so far — the cell editor, the arrangement strip, the Mixer & FX desk, the Compás Lab, Present, Go Live, the guided tour and the built-in User Guide. This manual quotes those labels in English, exactly as you will see them on screen.
Start with a rhythm
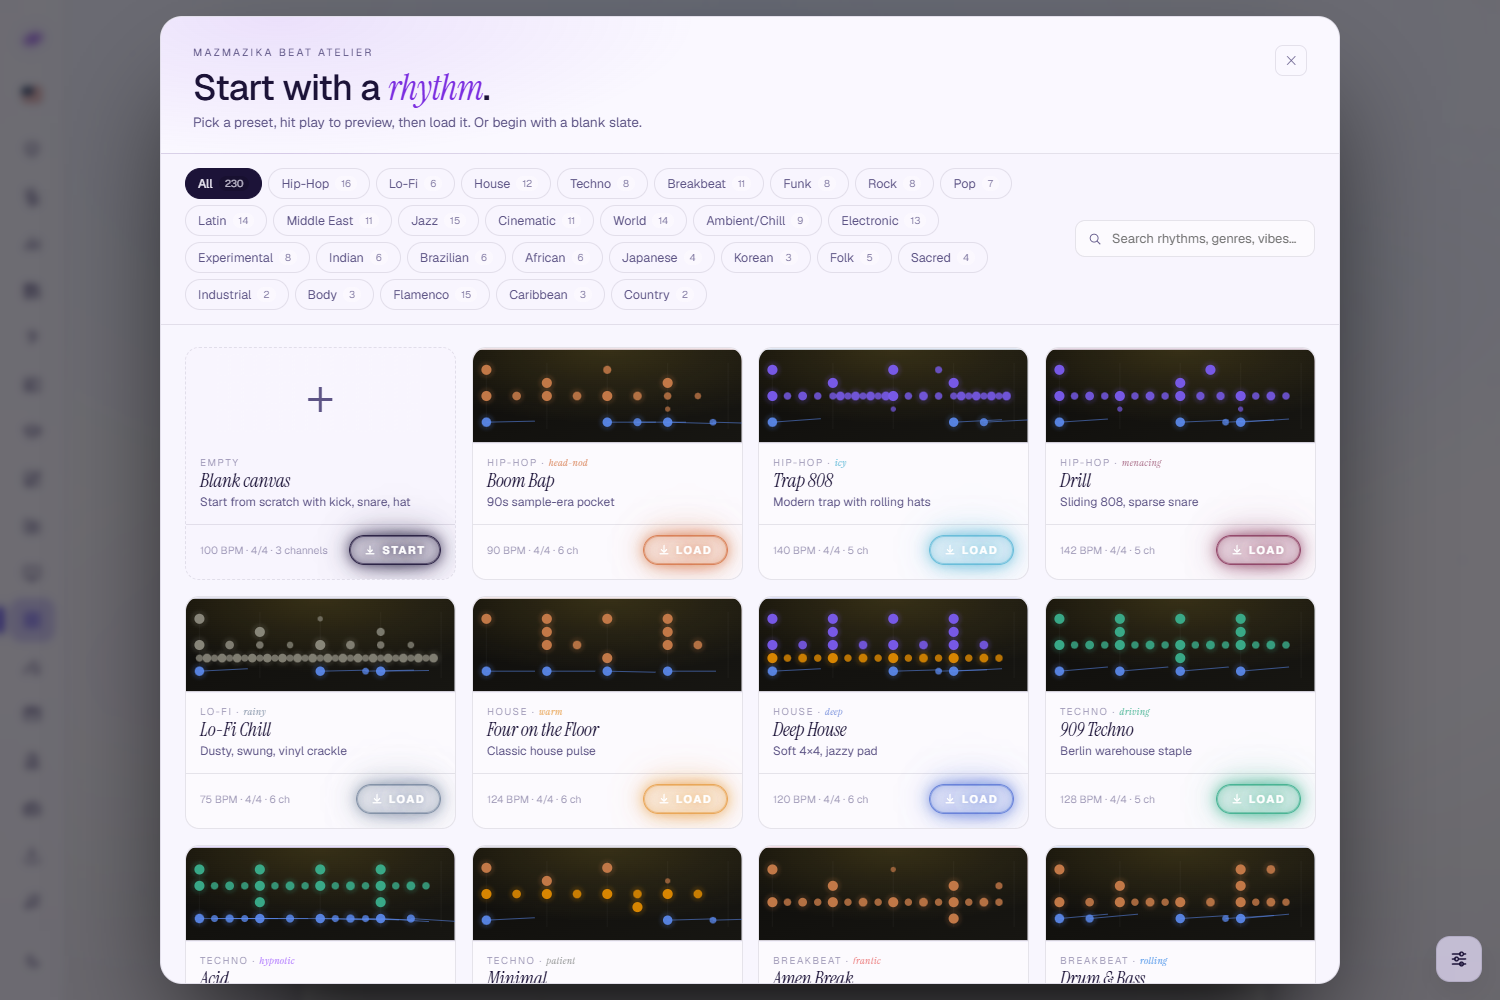
The quickest way in is to load a ready-made groove. The Start with a rhythm launcher opens automatically on a fresh session (and any time from Library → Ready Presets). Browse 230 presets across 28 genre categories — Hip-Hop, Lo-Fi, House, Techno, Breakbeat, Funk, Latin, Middle East, Jazz, Flamenco, Indian, African, Brazilian, Japanese, Korean, Cinematic and more — filter by category chip, or search by name, genre or vibe. Click a card's artwork to hear two bars, then click LOAD. Prefer a clean slate? Pick Blank canvas.
The step sequencer
Each instrument is a channel (a row) divided into beats. The playhead sweeps left to right as the beat plays, triggering the lit cells. Stack several channels — kick, snare, hats, bass, pad — to build a full groove.
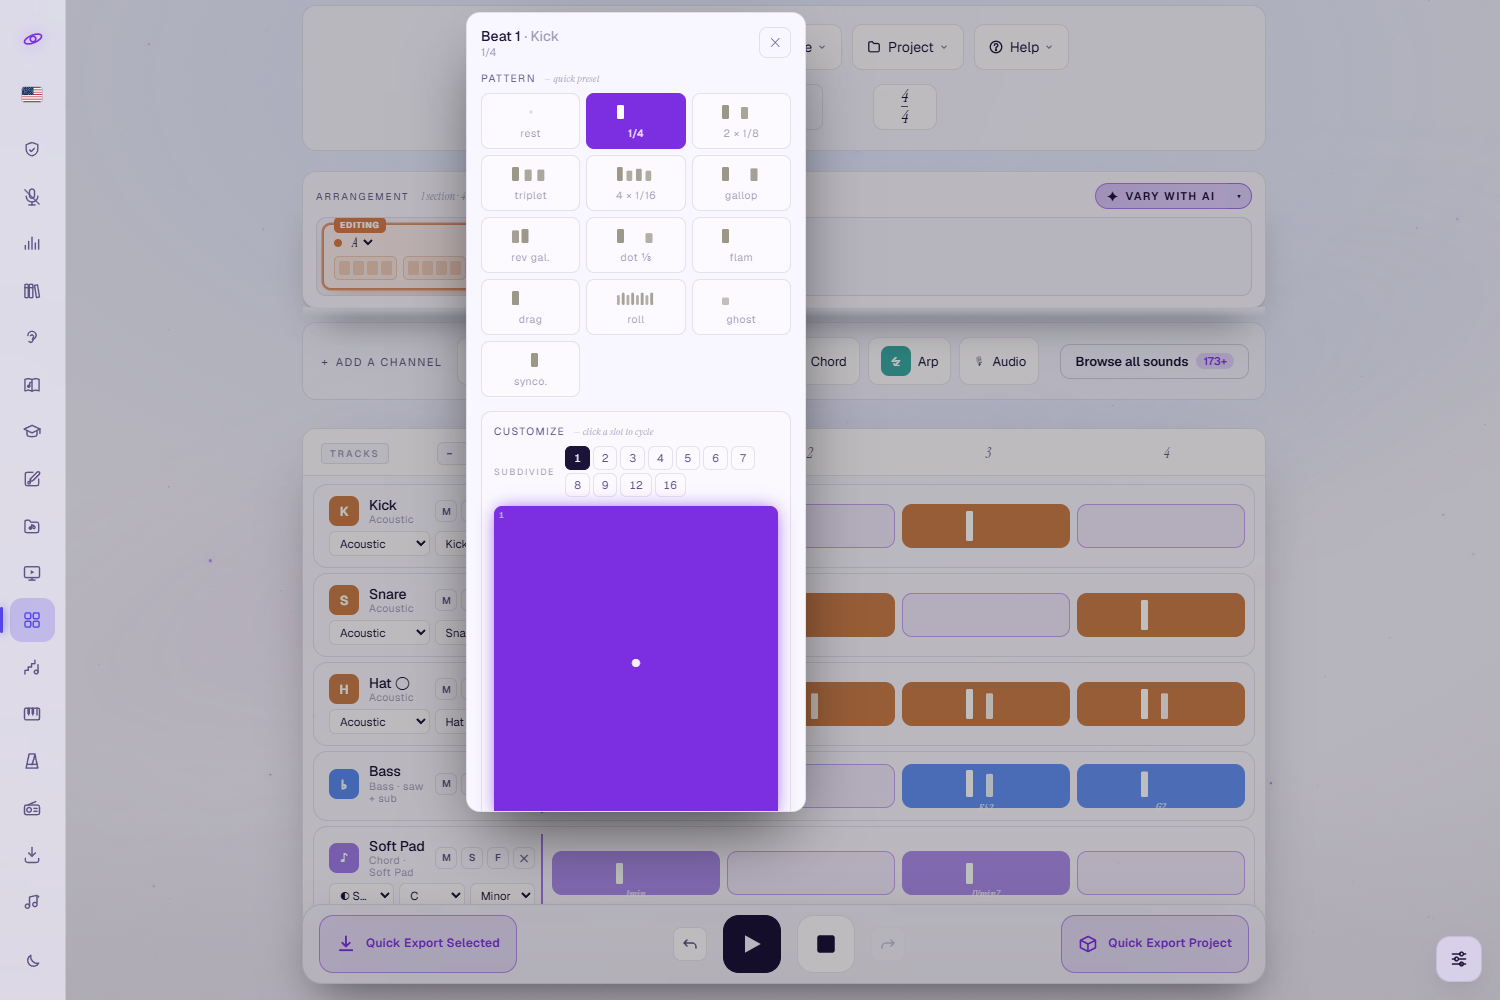
- Cell editor — a click on any cell opens its editor (it does not simply toggle the beat). Pick one of the 13 quick patterns — rest, ¼, two ⅛, triplet, 4×16, gallop, reverse gallop, dotted-8, flam, drag, roll, ghost, syncopate — or build your own under Customize: SUBDIVIDE the beat into 1–9, 12 or 16 slots and click each slot to cycle silent → ghost → normal → accent (right-click walks back). Below that sits the cell's Velocity. Right-click a cell in the grid to clear it instantly.
- Performance feel — give a cell CHANCE (the % it fires), RATCHET (2×, 3×, 4×, 6× or 8× sub-hits inside the cell) and MICRO (nudge it ±25% earlier or later). These show up as small badges on the cell.
- Pitch & microtuning — on a bass or lead cell the editor adds a note picker and a Microtune slider of ±50 cents, with ¼♯ and ¼♭ buttons for maqam and other 24-tone music. Chord cells get a Scale degree (I–VII) and a chord quality instead.
- Channel tags — on each channel head: M mute, S solo, F auto-fill (replaces the section's last bar — or every 4th bar of a looping pattern — with a generated fill suited to that instrument), and ✕ to remove. Click the channel name to rename it, or its icon to audition the sound.
Instruments & channels
Add voices from the Add a channel row. Use the quick chips for the common types, or open Browse all sounds to pick from the full library of 173+ synthesised instruments, organised by family.
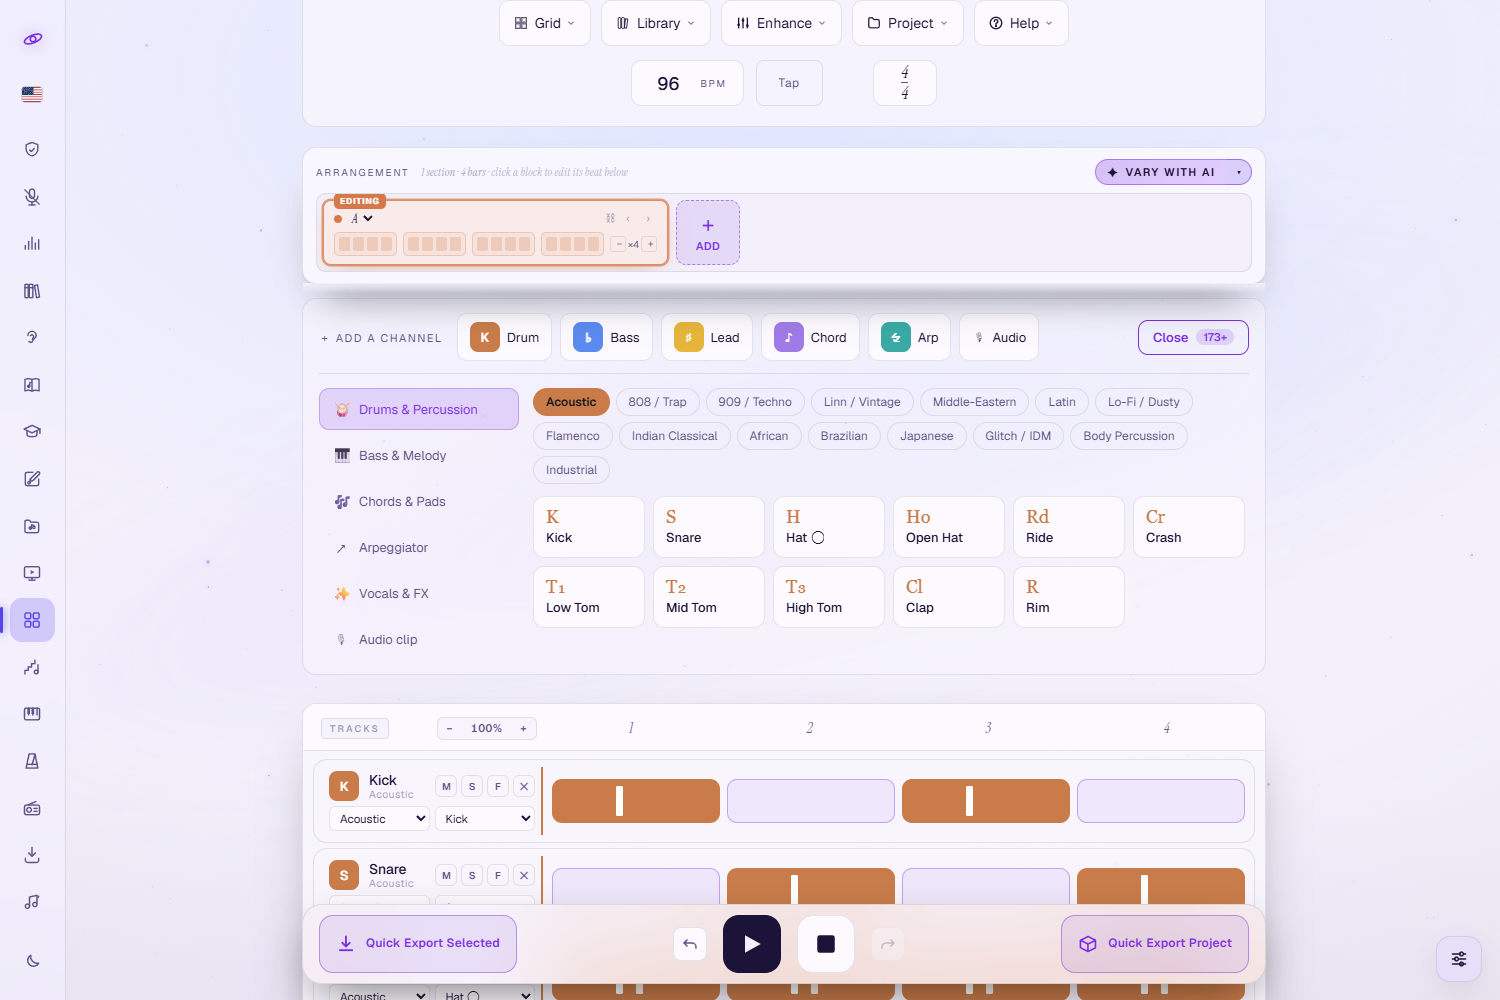
- Drum — choose one of 15 kits (Acoustic, 808/Trap, 909/Techno, Linn/Vintage, Middle-Eastern, Latin, Lo-Fi/Dusty, Flamenco, Indian Classical, African, Brazilian, Japanese, Glitch/IDM, Body Percussion, Industrial) and a voice within it — 145 in all, from kick and snare to doum, tek, congas, palmas and tacón. Both are dropdowns on the channel head, so you can swap the sound at any time.
- Bass and Lead — melodic synth lines with per-step pitch.
- Chord — pick one of 20 instruments (Soft Pad, Rhodes, Piano, Organ, Strings, Nylon Guitar, Sitar Drone, Accordion, Music Box and more) plus the project key and scale; chords follow your scale degrees.
- Arp — an arpeggiator that reads your chord channel, in six modes: up, down, up-down, random, as played, +octave.
- Vocals & FX — four vocal chops ("ah", "hey", "uh", "yeah") and four FX one-shots (riser, sweep, impact, glitch).
- Audio — record from your mic or upload your own file (see Your own audio below).
Transport, tempo & groove
- Play / Stop from the floating transport bar — or just press Space.
- Tempo — type a BPM (40–240) or hit Tap a few times at your desired speed to set it by ear.
- Time signature — click the signature pill for Common meters (4/4, 3/4, 6/8, 12/8), Odd meters (5/4, 7/8, 9/8, 11/8, 13/8, 15/8, 5/8, 21/8), Arabic Maqam cycles (Maqsum, Malfuf, Baladi, Saidi, Wahda Kabira, Dawr Hindi, Samai Thaqil), or write your own under Custom. Indian taals are not in this list — load them from the Compás Lab instead.
- Swing (0–75%) and Humanize (0–100%) live in the Enhance menu — loosen the timing so the beat breathes instead of sounding robotic.
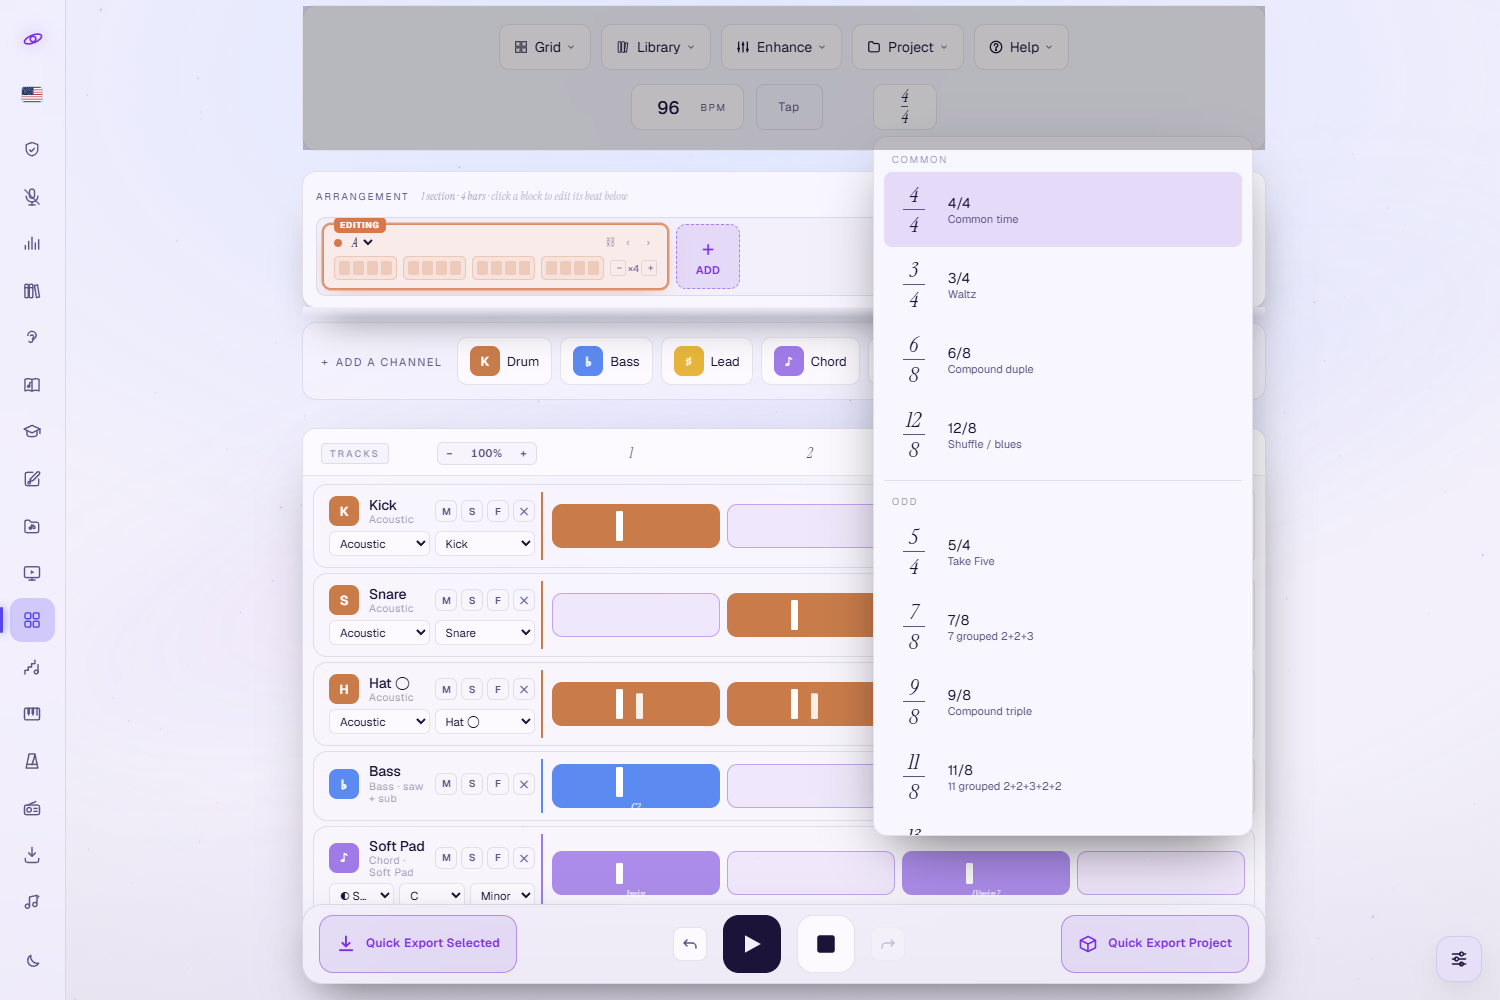
Four ways to see your beat
The first toolbar menu switches how the sequencer is drawn — pick whatever fits the music:
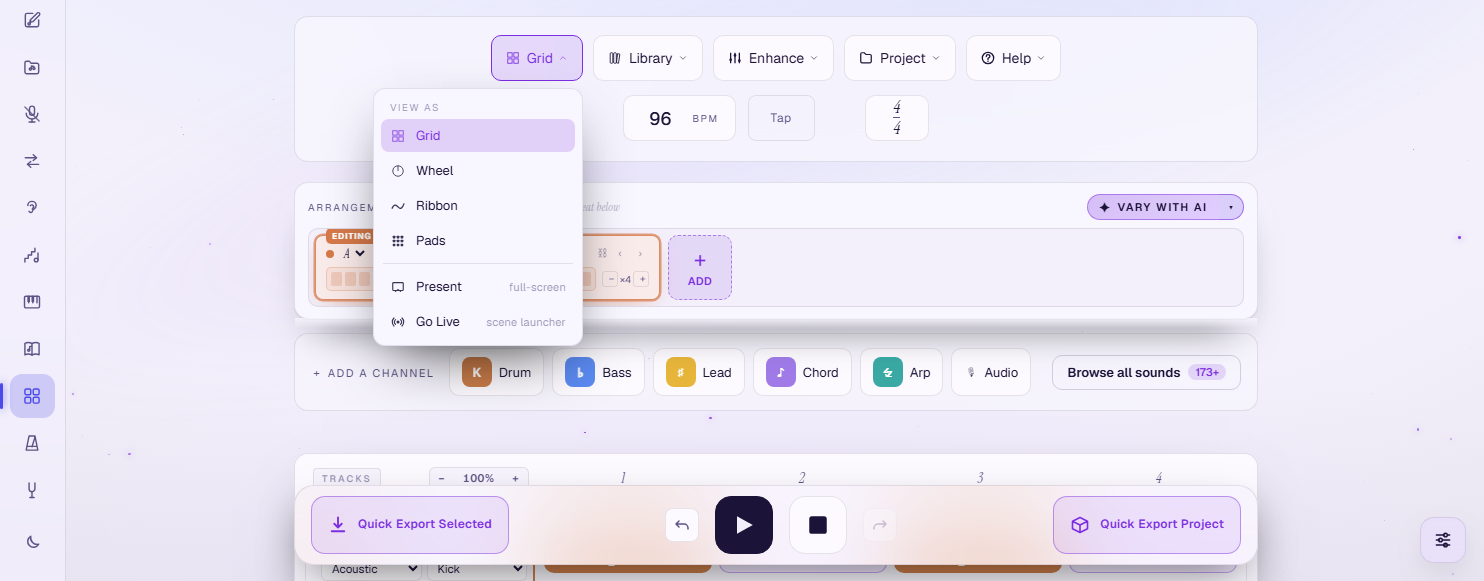
- Grid — the classic matrix; best for editing and seeing everything at once. Zoom it with the − 100% + control above the tracks (or ⌘+ / ⌘− / ⌘0, 50–220%).
- Wheel — a radial view with channels as concentric rings and beats around the rim; ideal for compás and iqaa'at (accent markers appear automatically for maqam signatures).
- Ribbon — flowing tiles per channel that scroll horizontally for long bars.
- Pads — a 4×4 MPC-style grid; tap a pad or press 1234 / QWER / ASDF / ZXCV to trigger a channel (hold Shift for a ghost hit, Alt for an accent). REC adds a fresh soloed Tap channel and records your live taps into the section you are on.
Patterns, sections & song mode
Each pattern is a one-bar loop. The Arrangement strip turns patterns into a full track: add sections with the + Add tile, choose which pattern each one plays from its dropdown, set how many bars it repeats (the ×4 stepper, up to ×64), and reorder them with the ‹ › arrows. Clicking a section plays and edits that one alone — it is the one marked EDITING, and it is what the sequencer below shows. Use each section's ⛓ button (or Shift-click) to chain several into a play selection, and ▶ Play all to hear the whole song end to end.

Note: the ✦ Vary with AI button and its ▾ menu on this strip are not switched on yet. Pressing either only reports AI unavailable in this context — nothing in your project changes.
Mixer & FX
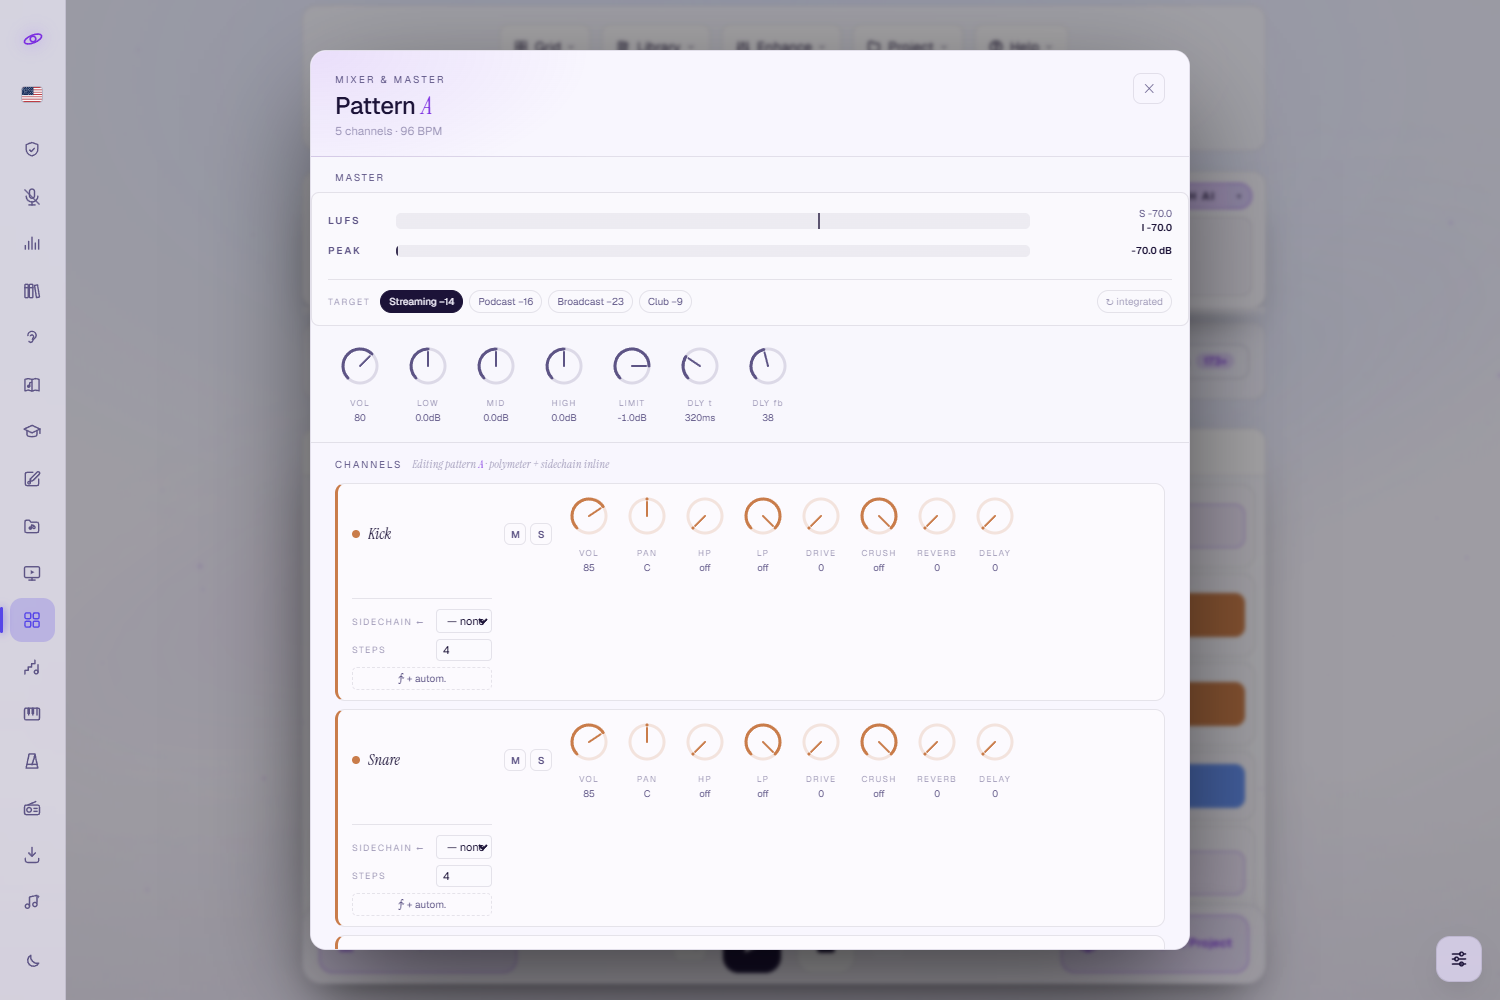
Open Enhance → Mixer & FX for a full mixing desk. Per channel you get VOL, PAN, HP and LP filters, DRIVE, CRUSH, REVERB send and DELAY send, plus mute/solo, a sidechain source and a per-channel step count for polymeter. The master section adds a 3-band EQ (±12 dB), an output limiter, shared reverb and tape-delay buses, and live LUFS / PEAK loudness meters with one-click targets for Streaming (−14), Podcast (−16), Broadcast (−23) and Club (−9). Double-click any knob to put it back to its default.
Compás Lab
Library → Compás Lab is a dedicated space for learning the world's rhythm cycles — 36 canonical patterns across six families: Arabic maqam iqaa'at, Indian taals, Flamenco compás, Latin/Afro-Cuban claves, African bells and Balkan odd meters.
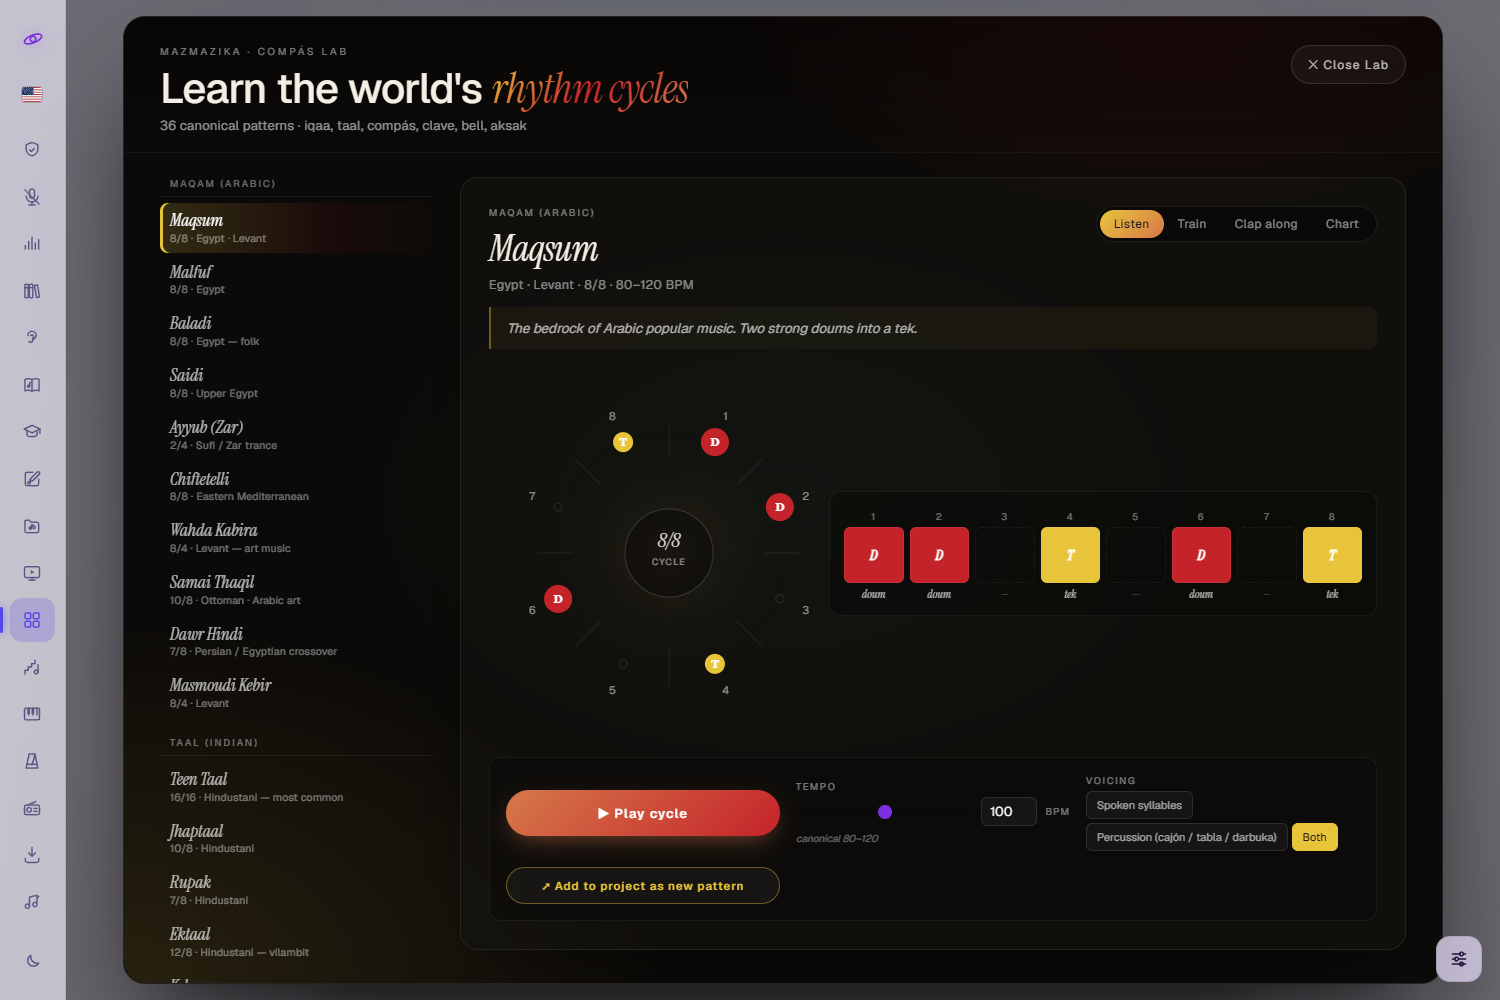
- Listen — hear the canonical cycle with traditional accents (doum, tek, ka, palmas), as spoken syllables, as percussion, or both.
- Train — a tempo trainer that ramps from a starting BPM up to a target over a set number of cycles.
- Clap along — enables your microphone, detects each clap and scores your accuracy and timing drift in real time.
- Chart — opens a printable score (notation, accent dots, syllables, origin and tempo range) in a new tab, ready to Print or save as PDF.
- Add to project as new pattern — one click drops the cycle into your project to build on. This is also how you get an Indian taal into a beat.
Your own audio
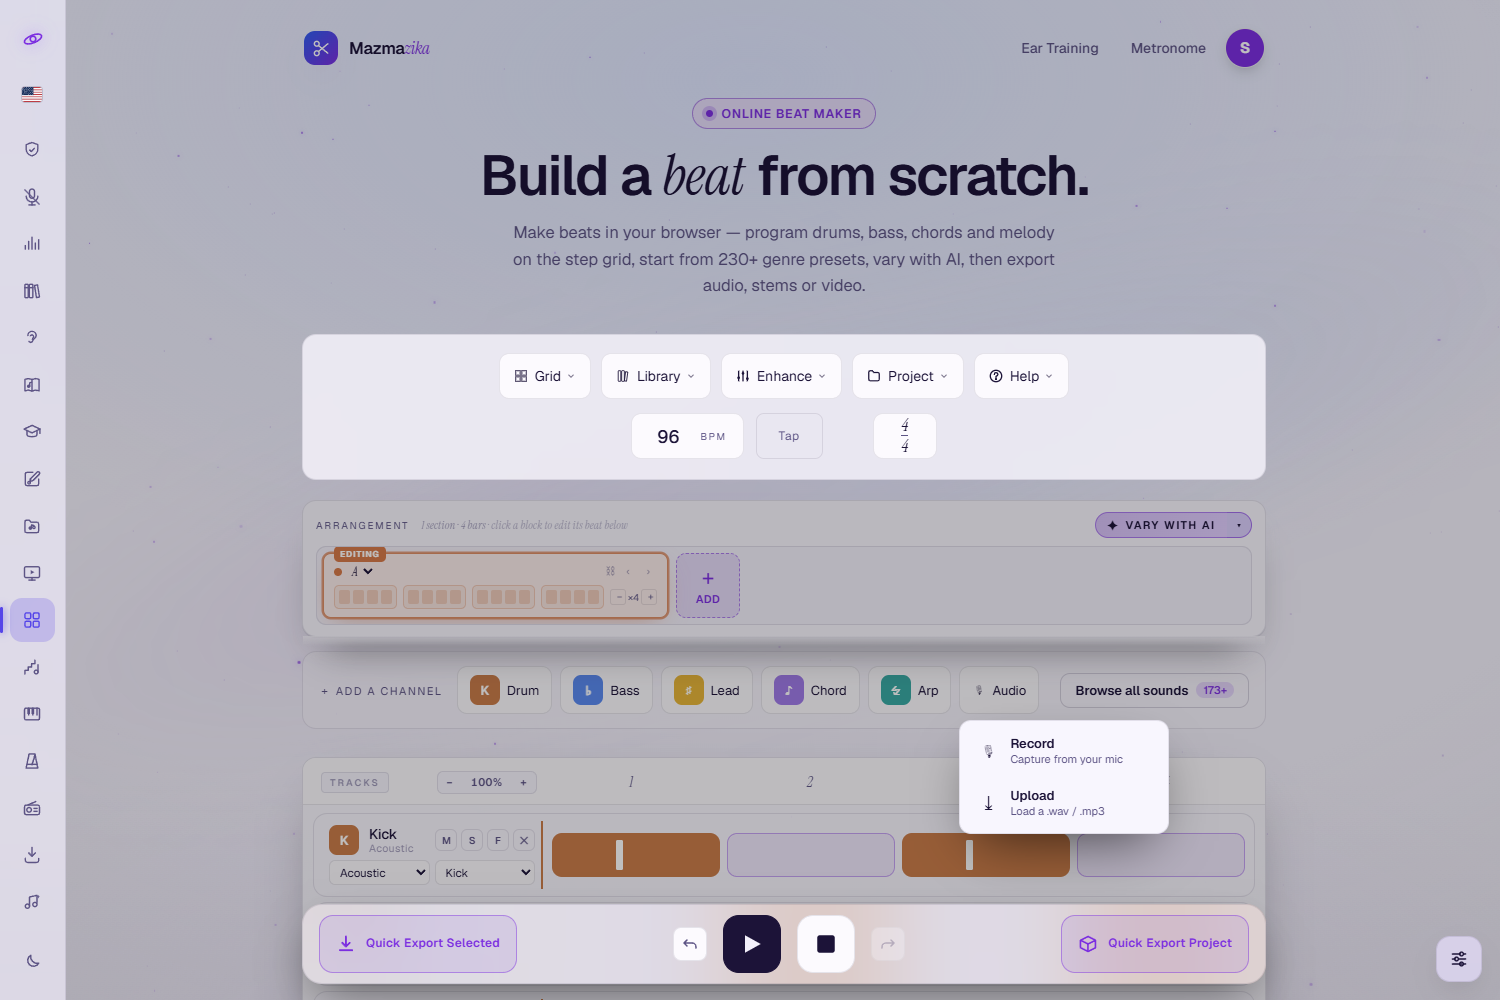
Use the Audio chip in the Add-a-channel row to Record from your microphone or Upload a .wav / .mp3 — you can also drag a file straight onto the channel. It drops in as an audio clip on its own lane: a waveform you can move and resize along the bar, fit to one loop or to a whole section, and play at its natural speed or stretched to fit. Recorded and uploaded audio is included when you export.
Stage modes & MIDI
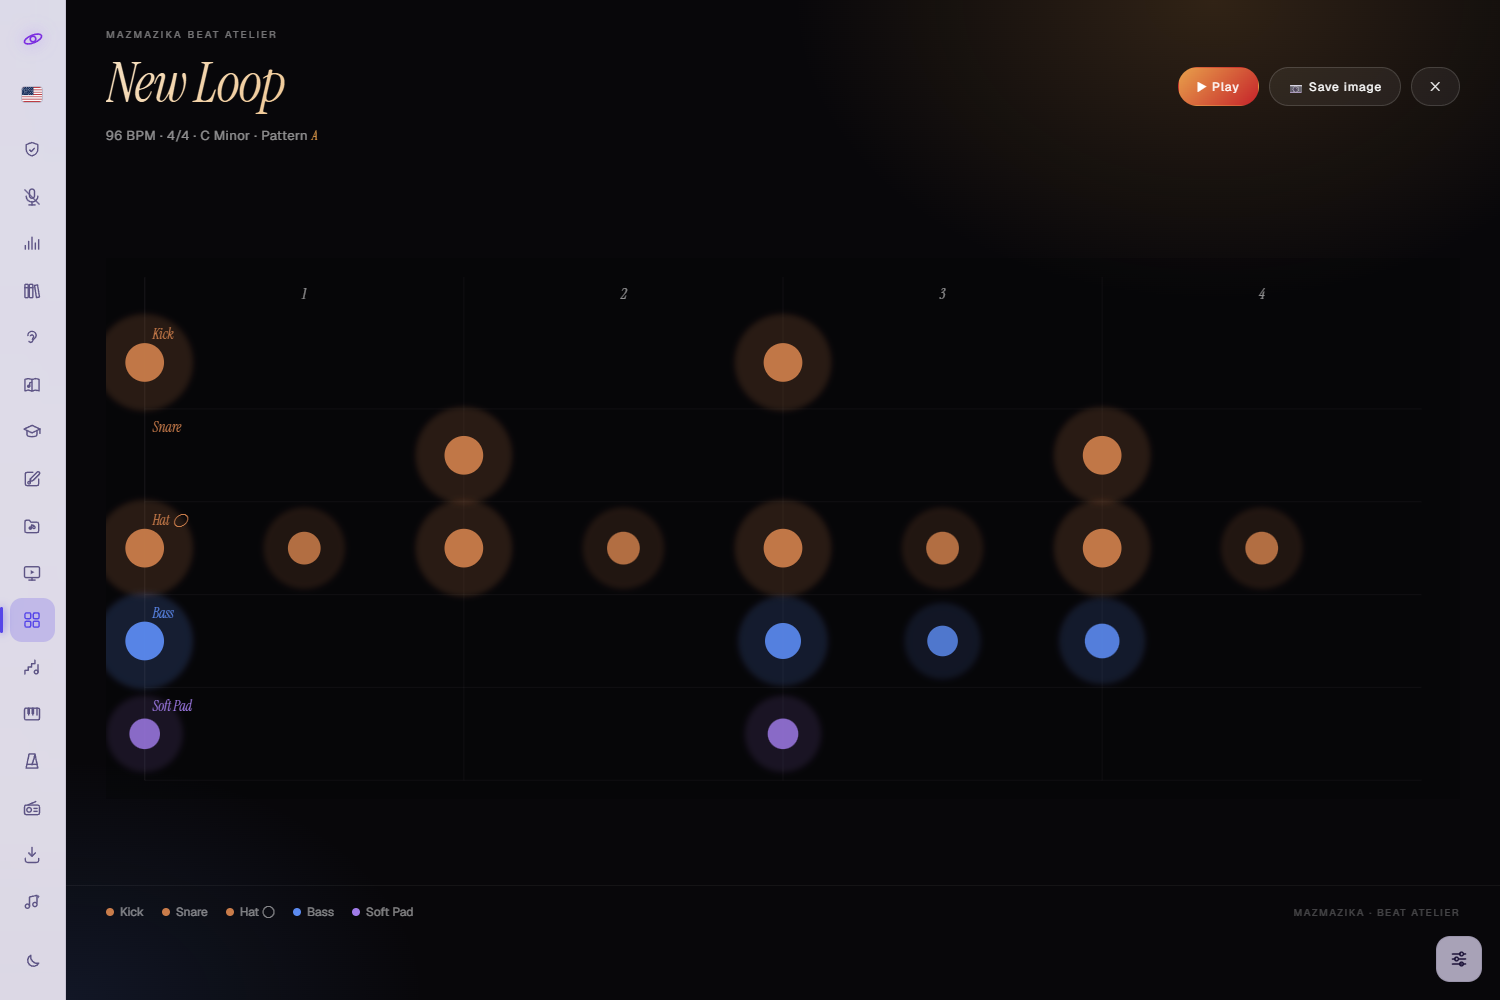
- Present — a full-screen, audience-facing stage view of your beat: the project name, tempo, signature, key and pattern up top, an animated large-scale visual of every channel's hits, a Play button and a one-click Save image for sharing. Press Esc to come back to the studio.
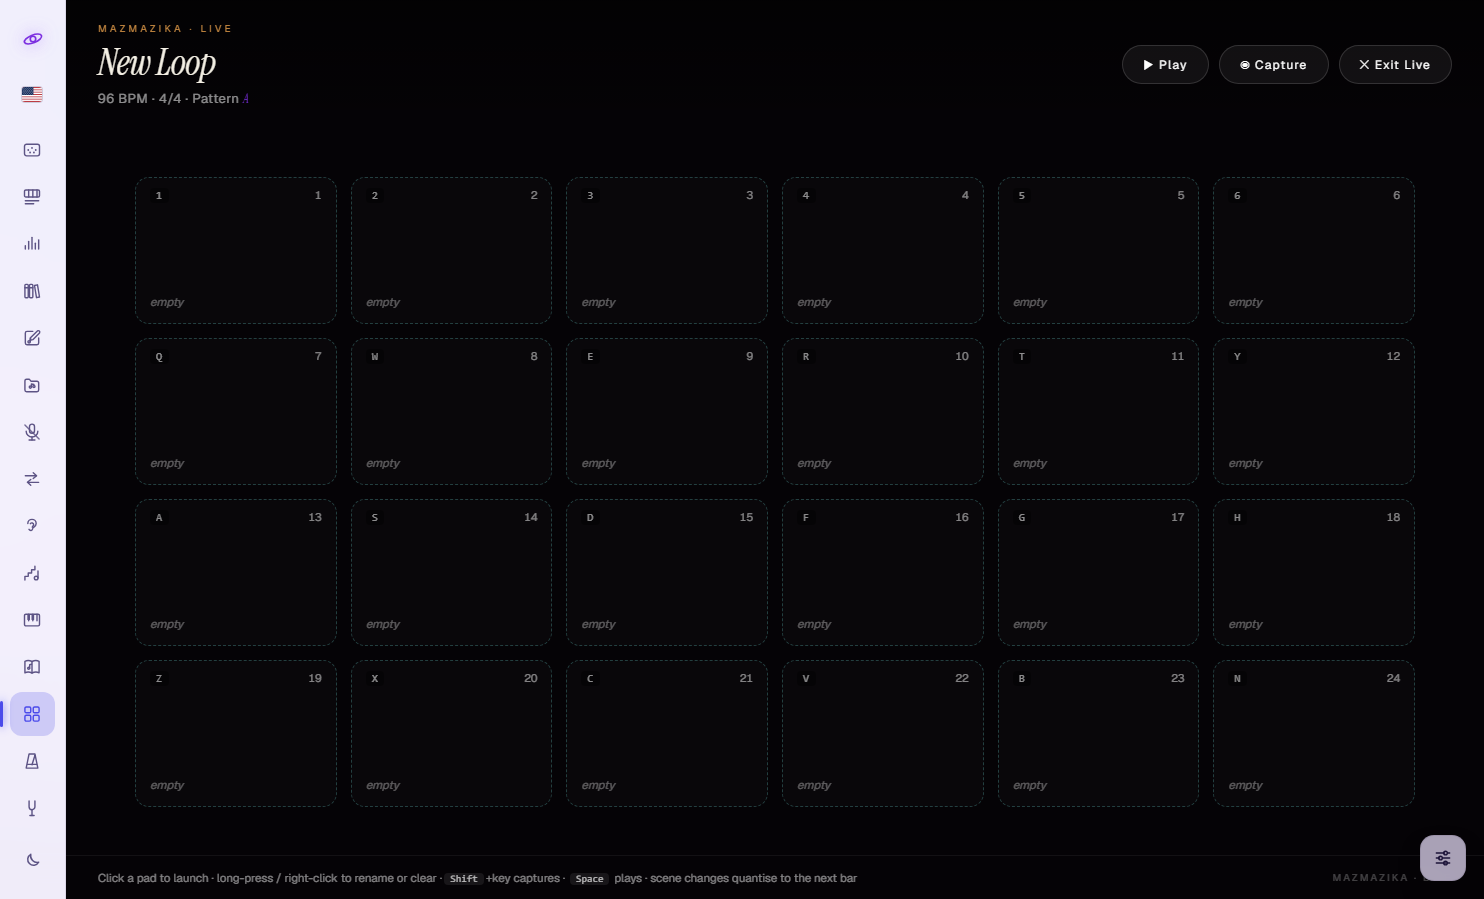
- Go Live — a full-screen scene launcher for playing your beat live. Its 24 pads each hold a snapshot of the current pattern, master mixer, tempo and swing; click an empty pad (or ◉ Capture, or Shift + its key) to store one, then press 1–6 / QWERTY / ASDFGH / ZXCVBN to launch it. Scene changes land on the next bar, so the switch stays musical, and the header shows what is queued. Right-click a pad to rename or clear it.
- MIDI input — plug in any USB/Bluetooth MIDI keyboard in a Web-MIDI browser (Chrome or Edge) and the MIDI pill appears in the toolbar; notes play live through your pitched channels, and ● keep writes the last bar you played onto the grid. Add a Bass, Lead or Chord channel first — that is what it records into.
Save, projects & autosave
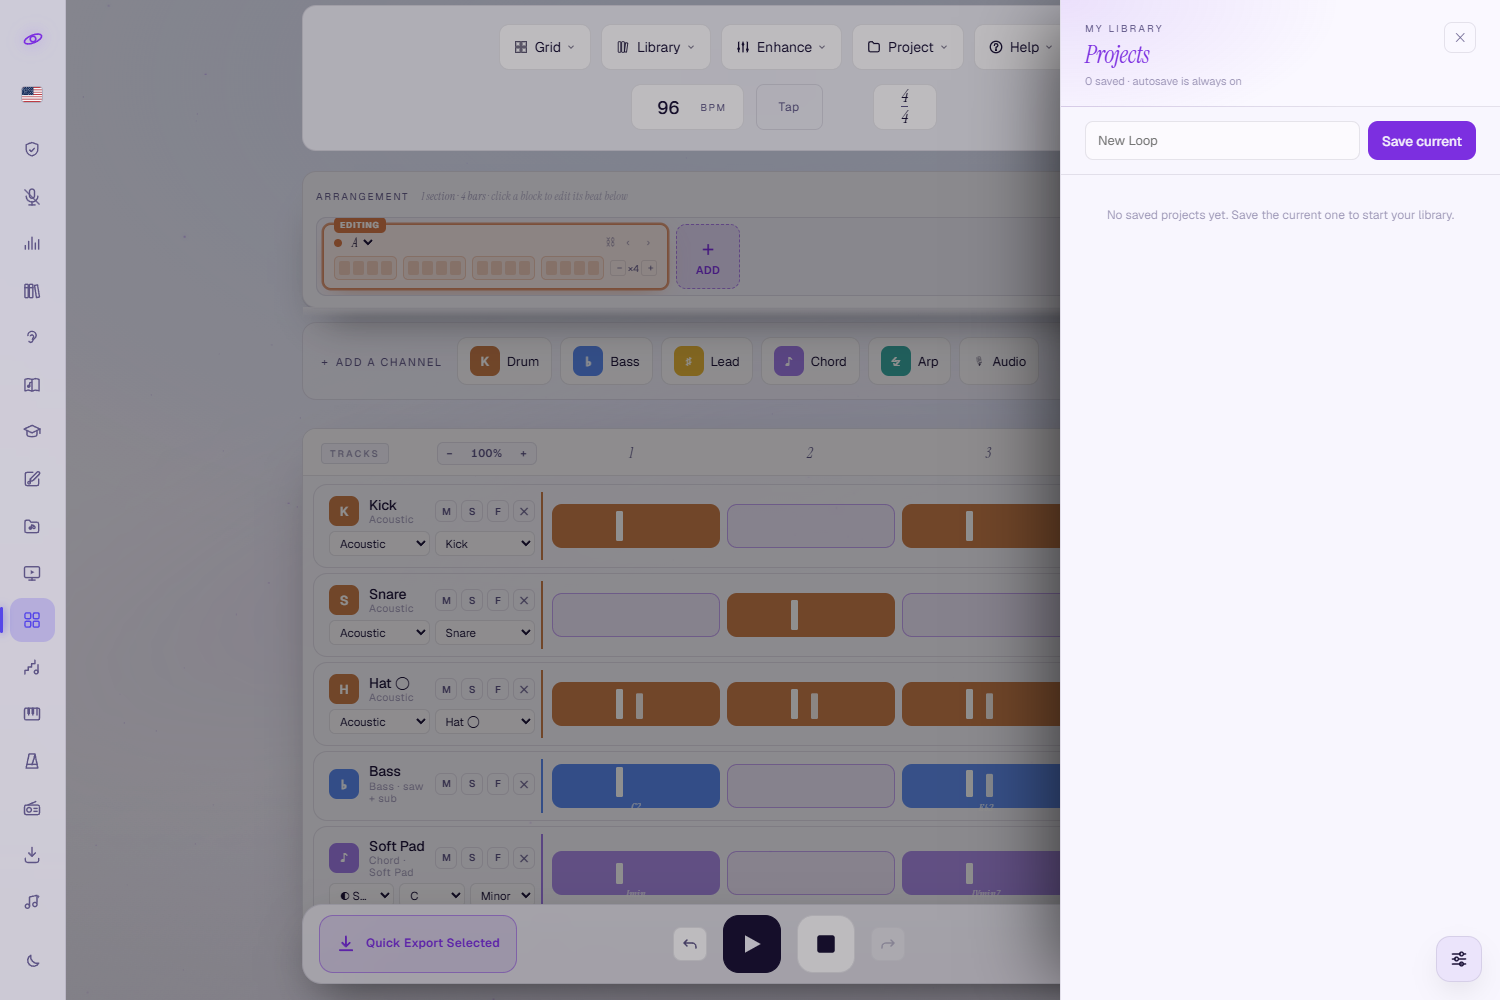
Everything auto-saves half a second after you stop editing — the Projects drawer even reminds you that autosave is always on. Use Project → Save to My Projects (or ⌘S) to keep named versions in My Projects, and reopen them from the same drawer. A full undo/redo history (⌘Z / ⌘⇧Z) keeps your edits safe while you experiment. Start fresh any time with Project → New project.
Worth knowing: the autosave and My Projects live in this browser on this device, not in your Mazmazika account. They survive a refresh and a reboot, but they do not follow you to another computer or to a private window, and clearing your browser data removes them. To move a beat somewhere else — or to keep a copy you cannot lose — use the Share link or the JSON export below; both restore the whole project.
Export & share
Open Project → Export selected or Export project for the full export platform. The footer's two Quick Export buttons bundle either the selected loops or the whole project straight to a ZIP in one click.
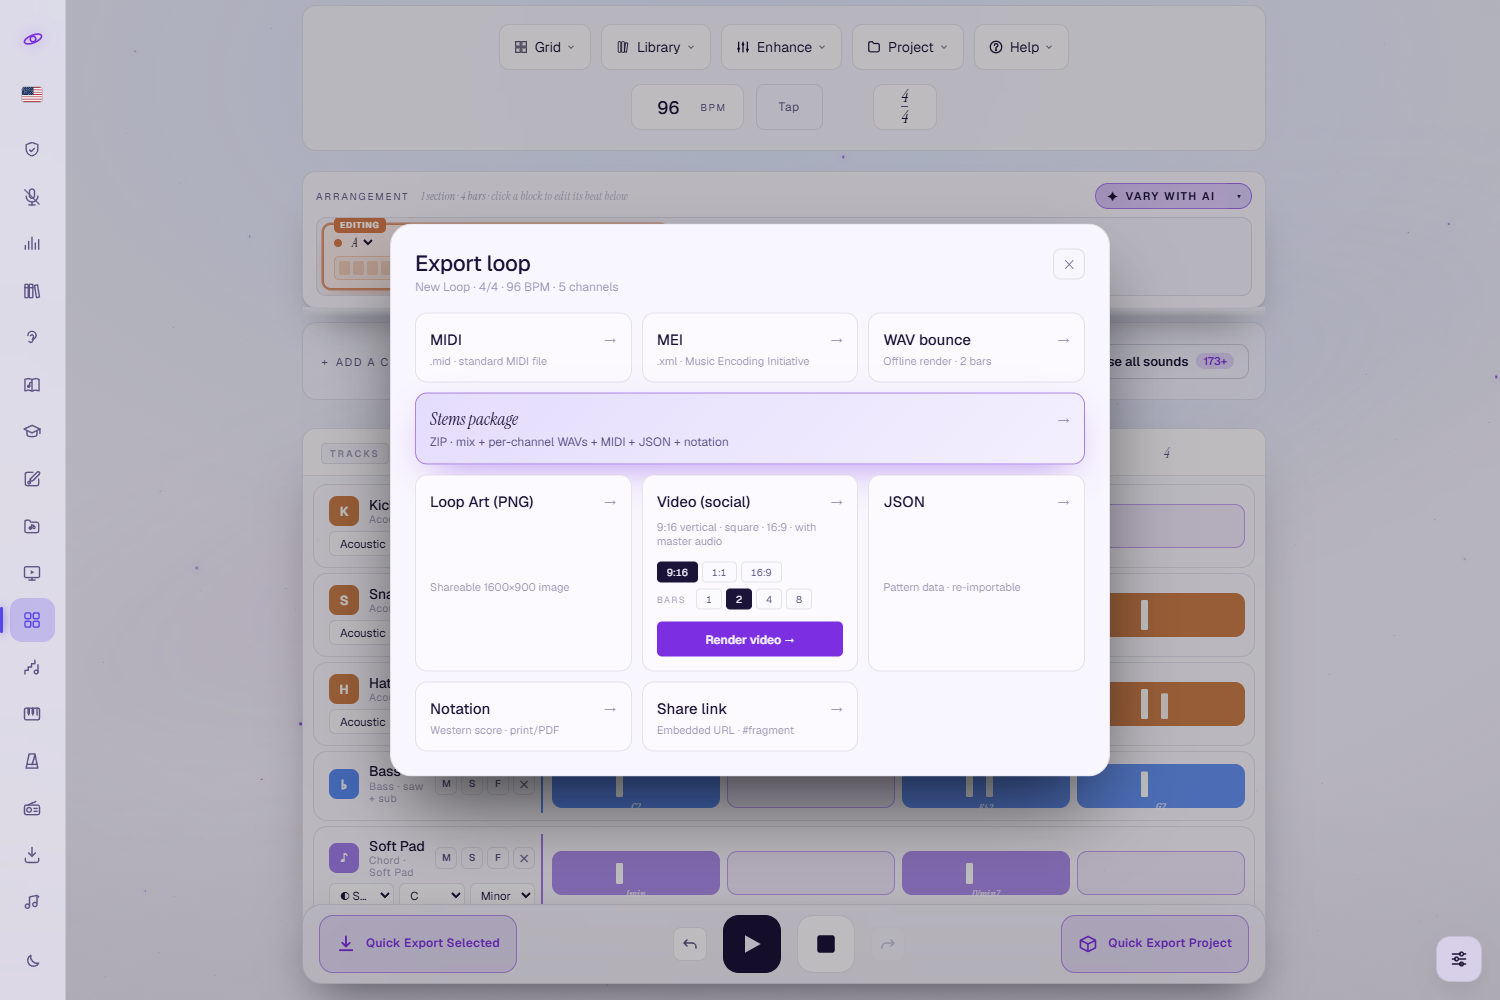
- Stems package (featured) — a ZIP with the full mix, every channel rendered to its own WAV (with effects), plus MIDI, MEI score, JSON and printable notation.
- WAV bounce — an offline render of two bars to a .wav file.
- MIDI · MEI · JSON — standard files you can open in other software (JSON is re-importable here).
- Video (social) — a .webm video of the beat with its visualisation and master audio, in 9:16 vertical, 1:1 square or 16:9, over 1, 2, 4 or 8 bars.
- Loop Art (PNG) — a shareable 1600×900 image.
- Notation — a print-ready Western score in a new tab.
- Share link — the whole project encoded in a URL, copied to your clipboard, ready to send to anyone.
Handy keyboard shortcuts
- Space — Play / Stop
- ⌘Z / ⌘⇧Z — Undo / Redo
- ⌘K — Command palette (search every action)
- ? — User Guide
- ⌘S — My Projects
- ⌘+ / ⌘− / ⌘0 — Zoom in / out / reset
- Esc — close any overlay
Tips
- Start from a preset, then make it yours by editing cells and swapping sounds.
- Add a little Swing and Humanize so the groove feels human.
- Use Solo/Mute in the mixer to focus on one part while you program it.
- Save to My Projects early and undo freely while experimenting.
- Any screen works — the studio adapts to phones and tablets (channels stack into one column and you can pinch-zoom the grid), though a desktop monitor is the most comfortable for long sessions.
Troubleshooting
- No sound? Click anywhere on the page first (browsers only start audio after you interact), then check the channel and master volumes and your device volume.
- Slow to load? The Beat Maker is a large app — give it a moment on first open, and use an up-to-date Chrome or Edge.
- MIDI keyboard not detected? Use Chrome or Edge (Web MIDI), then reconnect the device and tap anywhere in the studio once — MIDI access starts on your first interaction.
- Your beat has disappeared? The studio remembers your work per browser, so a different browser, a private window or freshly cleared site data all start empty. Reopen the one you were working in, or restore the project from a Share link or a JSON export.
- On a phone? The studio is fully responsive: the toolbar and channel chips wrap, the sequencer fits your screen width, and you can pinch-zoom for detail work. If something looks cramped, rotate to landscape or use the grid zoom (⌘+ / ⌘−).
Related tools
Build melodies on the Virtual Piano, keep time with the Metronome, find a song's chords with the Chord Analyzer, or split a track into stems with the Vocal Remover.